To blur photo background distractions while keeping your subject sharp, you first have to separate the subject from everything behind it, and free AI tools now do that for you. This guide is for anyone fixing a headshot, product shot or social post. You’ll get the fastest free method, step-by-step options for iPhone, Pixel, Samsung, Canva and Windows, and the checks that make the blur look natural.
How to blur the background of a photo
To blur the background of a photo, open a free tool such as the Soft Learn Hub Background Remover, let its AI cut out the subject, choose the Blur background and download a PNG or JPG; it’s free, needs no sign-up and runs in your browser. On iPhone, Pixel or Samsung, Portrait mode adds blur you can adjust later. Uniform blur can’t fully mimic a real lens, so keep it moderate.
In this guide
Still have the phone that took the picture? Check its Portrait tools first, because the phone already knows which parts of the shot are subject and which are background. For any other photo, start with the browser method.
Blur photo background free with our browser tool
The fastest free way to blur image background clutter on a photo you already have is the Blur option in our free AI background remover. There’s no account, no watermark and nothing to install.
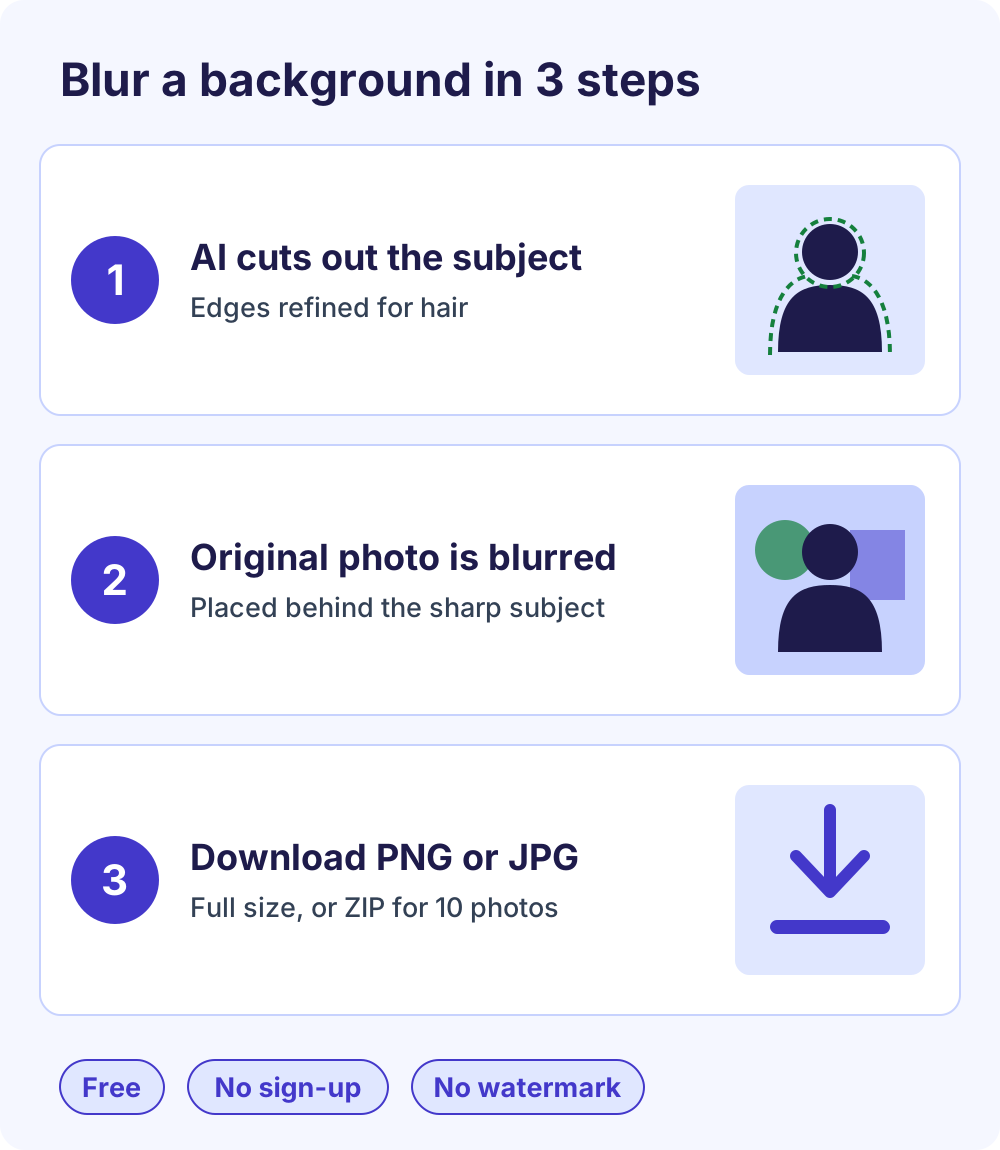
- Add your photos. Drag in a JPG, PNG or WebP file up to 25 MB, or select up to 10 photos at once.
- Let the AI cut out the subject. The first run downloads the AI model to your browser, so it takes a little longer; later photos are faster. Edge refinement helps with hair.
- Choose Blur as the background. The tool blurs a copy of your original photo and places the sharp, cut-out subject on top.
- Check the edges. Drag the before-and-after slider, and use Touch up edges to restore a missed strap or erase a stray patch.
- Download. Save a PNG or JPG at full resolution, or use Download all (ZIP) for a batch.
The blur strength is set for you. It’s a uniform, Gaussian-style blur with a radius of roughly one-sixtieth of the photo’s longest side, so a 3,000-pixel photo gets about a 50-pixel blur and a small web image gets proportionally less.
Processing happens on your device, so your photos aren’t uploaded to a server. The trade-off: this isn’t a depth-based lens blur, so everything behind the subject is softened by the same amount. For a lighter effect or a lens-style falloff, use one of the slider-based methods below.
Blur photo background options compared
The right method depends on whether the photo is already taken, which device you’re on and how much control you want. Here’s how the main options compare, current as of October 2026.
| Method | Works on photos already taken? | Blur control | Cost |
|---|---|---|---|
| Soft Learn Hub Background Remover (Blur) | Yes, any photo | Automatic uniform blur, edge touch-up | Free, no sign-up |
| iPhone Portrait mode + Photos | Portrait photos, plus Photo-mode shots with depth on iPhone 15 and later models | Depth Control slider, focus point | Built in |
| Google Pixel Portrait + Google Photos Blur | Yes, when Blur is offered for that photo | Blur slider | Built in on Pixel |
| Samsung Galaxy Portrait (Background effect) | Photos taken in Portrait mode | Intensity bar | Built in |
| Canva Auto Focus | Yes | Blur intensity and Focus position | Free on Canva |
| Windows Photos (Background panel) | Yes | Blur intensity slider, mask brush | Built in |
| Snapseed Lens Blur | Yes | Manual focus shape and strength | Free app |
| Photoshop Lens Blur | Yes | Even or depth-map blur, noise | Paid Adobe plan |
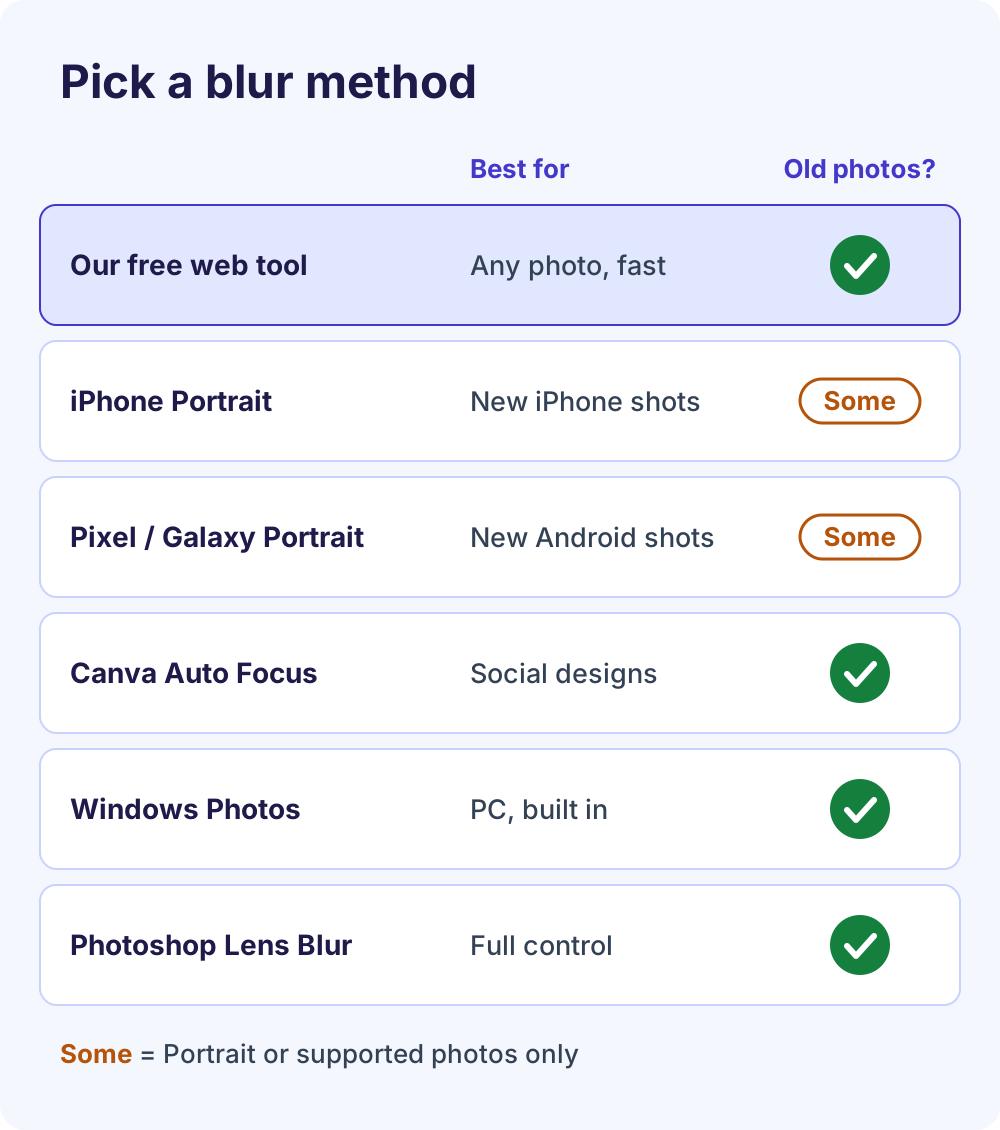
A simple rule: if the phone’s Portrait mode took the shot, adjust that first. If not, any subject-detecting tool works, and the difference is how much control you get. If you need a cut-out rather than a blur, see our comparison of free background remover tools.
How to blur background on iPhone
On iPhone, shoot in Portrait mode, then fine-tune the blur in Photos with the Depth Control slider. These steps follow Apple’s iPhone User Guide for iOS 26.
Before you take the photo
- Open Camera and swipe to Portrait mode. On supported models, you can stay in Photo mode and tap the portrait button that appears when a face is detected.
- Tap the controls button or swipe up from the bottom of the screen, tap Aperture, then drag the slider. A smaller f-number means more blur.
- Tap the Shutter button.
After you take the photo
Open the portrait in Photos, tap the Edit button and drag the Depth Control slider. A dot marks the original value, so you can always find your starting point. Tap Done, and use Revert later if you want the original back.
On iPhone 15 and later models Apple lists as supported (the iPhone 16e isn’t on that list), photos of a person, dog or cat taken in Photo mode can become portraits: open the photo, tap Edit, select Portrait and turn it on. On iPhone 13 or later, you can also tap a new spot to change the focus point. See Apple’s guide to editing Portrait mode photos.
How to blur background on Android: Pixel and Samsung
Android phones use Portrait mode when you shoot and a blur control afterward, but menu names vary by brand and software version.
Google Pixel and Google Photos
- In the Camera app, tap Portrait in the mode carousel, then tap Shutter.
- To add or change the blur later, open Google Photos, select the photo and tap Edit, then Tools, then Blur.
- Move the Blur slider, then save. Choose Save as copy to keep the original.
Those steps come from Google’s Pixel Camera Help. On the web, Google Photos Help lists Blur under Edit > Tools. Google notes that tool options depend on the photo and some features are Pixel-only, so Blur won’t appear for every image.
Samsung Galaxy
- In Camera, choose Portrait (on some models it’s under More).
- Tap the background effect button, pick Blur and drag the adjustment bar to set the intensity.
- Take the photo. You can change the background effect afterward, too.
To edit later, open the photo in Gallery, tap the Details icon and look for Background effect among the edit suggestions. Samsung’s support page says that suggestion only appears for photos taken in Portrait mode.
Samsung’s Portrait mode guide warns that blur may not apply well if the phone or subject moves, the subject is thin or transparent, or its color or pattern matches the background.
How to blur background of photo already taken
For a finished photo with no portrait data, use a tool that detects the subject: our browser tool, Canva’s Auto Focus, the Windows Photos app or Snapseed. To blur image background areas with full manual control, use Photoshop.
Canva Auto Focus and Blur
Select the photo, choose Edit, go to Tools, select See all, then Auto Focus. Drag Blur intensity to set the strength and Focus position to choose what stays sharp; Remove Auto Focus undoes it. The steps are in Canva’s Auto Focus help article.
Canva’s separate Blur tool, in the same menu, blurs the whole image or brushed areas. A handy trick from Canva’s blur guide: blur the whole image, then use the Remove brush to bring the subject back into focus. To cut a subject out instead, see our guide to removing a background in Canva.
Windows Photos app
Open the photo, select Edit image (Ctrl+E), then the Background panel; the app selects the background automatically. Select Blur, drag the Blur intensity slider and select Apply. If it misjudges an area, turn on the Background brush tool and use Add mask or Remove mask. Microsoft’s Photos help says the separation runs locally on your device.
Snapseed Lens Blur
Snapseed, Google’s free editor for iPhone and Android, includes Lens Blur. You place a linear or elliptical focus area by hand, then adjust Blur Strength, Transition and Vignette Strength, as described in Snapseed Help. It doesn’t trace the subject’s outline, so it suits centered subjects more than detailed cut-outs.
Photoshop Lens Blur
If you already pay for Photoshop, the Blur background Quick Action (Discover panel > Browse > Quick Actions) is the one-click route. For control, go to Filter > Blur > Lens Blur. Set the Depth Map source to None for an even blur, or to a Layer Mask or Transparency depth map so the blur changes with distance.
Blur Focal Distance picks what stays sharp, Radius sets the strength and Noise adds grain back, according to Adobe’s Lens Blur guide. In any layer editor, the manual route is to duplicate the photo, blur the bottom layer and mask the top one so only the sharp subject shows.
Uniform blur vs depth (lens) blur
Uniform blur softens everything behind the subject by the same amount. Depth, or lens, blur increases with distance from the point of focus, the way a real camera lens behaves. Uniform blur is fast and predictable; depth blur looks more photographic.
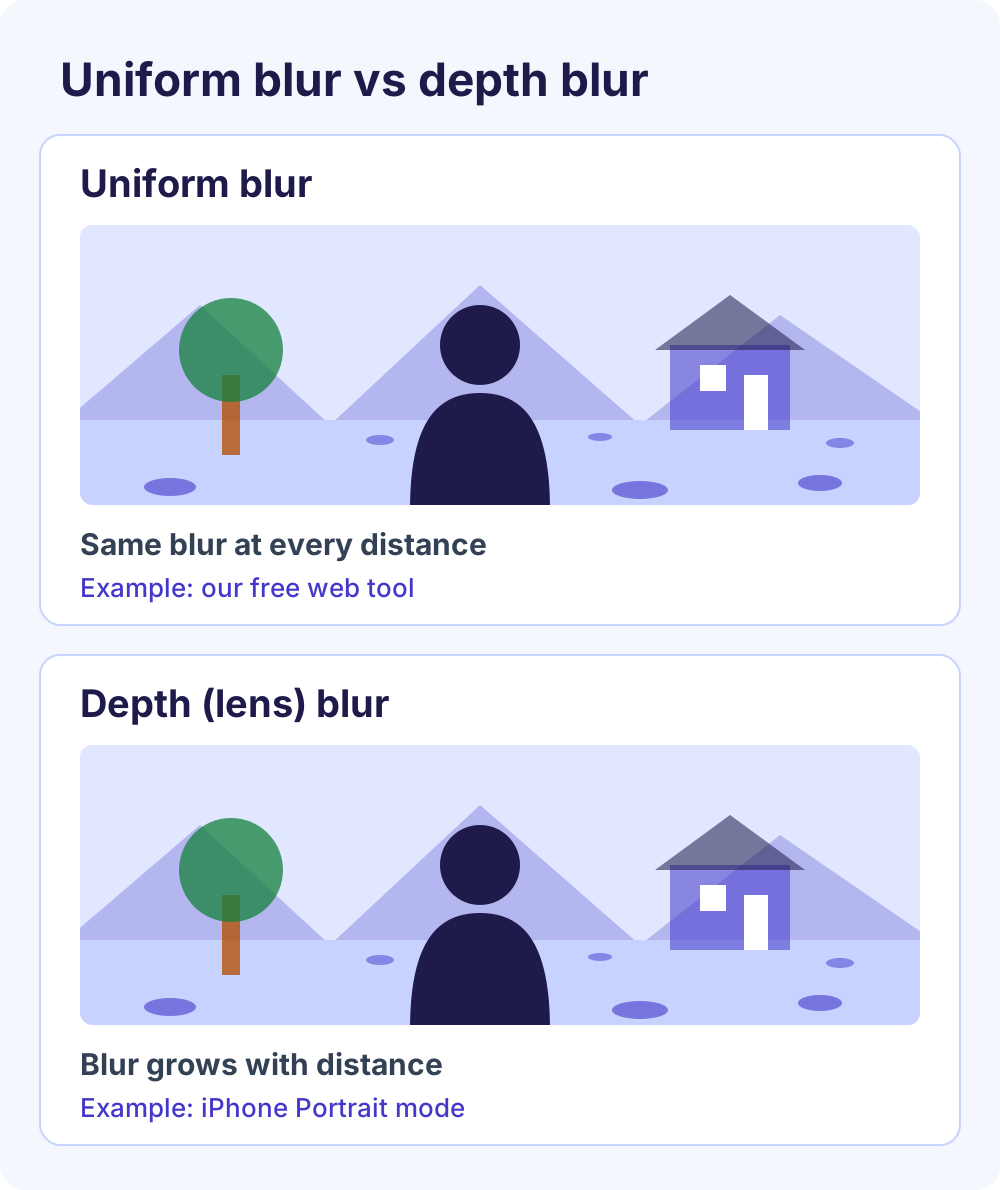
- Uniform blur: one strength for the whole background. Our tool, Canva’s whole-image Blur and the manual layer method work this way. It suits headshots against a wall, product shots and busy backgrounds you want quieter.
- Depth blur: near objects stay fairly sharp and distant ones melt away. iPhone Portrait mode uses the depth information it captures, and Photoshop’s Lens Blur does it with a depth map. It’s better for a street, a hallway or a full-length portrait.
The giveaway of a uniform blur is often the ground: a real lens keeps the floor at someone’s feet as sharp as the feet, while a uniform blur softens it like the far wall.
How much blur looks natural?
Use enough blur to separate the subject, but not so much that the background turns into a smear. If people can still tell it’s an office, a park or a kitchen, the strength is usually right. A wall a few feet back should stay more recognizable than a distant skyline.
- Judge at the final size. Shrinking an image shrinks the blur with it, so a blur that looks heavy at full size can look mild as a small profile picture.
- Use the f-number on iPhone. A smaller f-number means more blur, and the dot on Apple’s slider marks the original, so nudge it either way and compare.
- Keep context when it matters. Real estate, event, travel and product-in-use photos need a recognizable setting.
- Go stronger for clutter. A messy room or passers-by can take a heavier blur, especially in a tight headshot crop.
When you blur photo background areas with our tool, the automatic setting is a moderate, portrait-style strength: fine detail disappears, while large shapes such as windows and doorways usually stay readable. For a gentler effect, use an app with a slider.
Common background blur mistakes and how to fix them
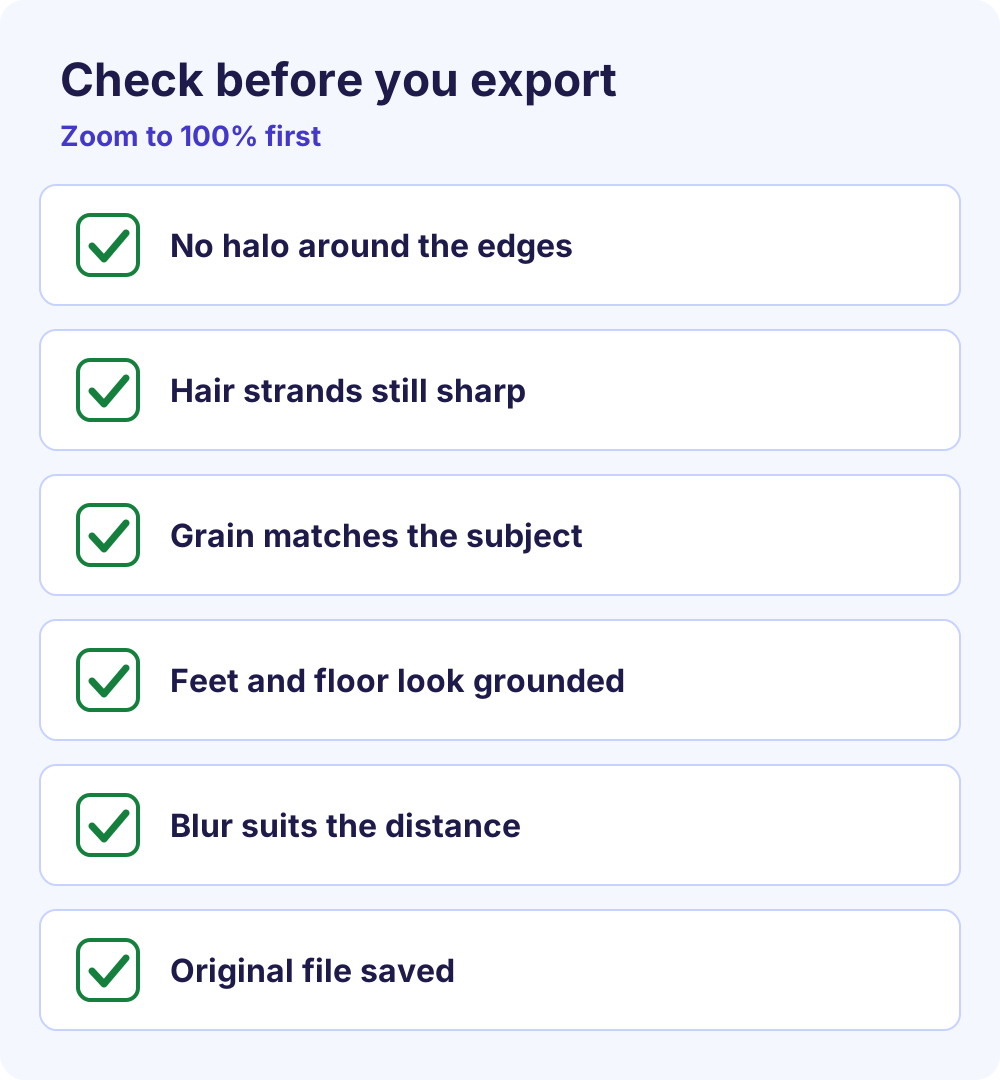
Most fake-looking blurs come from a handful of problems at the subject’s edge or in the image texture. Zoom to 100% and check these before you export.
Halo or glow around the edges
When the whole photo is blurred and the sharp subject is laid on top, the subject’s own colors spread just outside its outline and leave a soft glow. Our tool works this way, so look for it around dark subjects on bright backgrounds. In a layer editor, fill or clone the subject out of the bottom layer before blurring; otherwise, use a lighter blur.
Blurred or chopped-off hair
Fine strands are the hardest part of any cut-out. If the AI treats them as background, they get blurred or cut off and the head looks pasted on. Use a touch-up brush, such as Touch up edges in our tool or Add mask in Windows Photos, and shoot against a background that contrasts with the hair.
Mismatched grain and noise
Blurring wipes out the background’s grain while the subject keeps its own, so the two stop matching, especially in low-light shots. Add a little noise back to the background (Photoshop’s Lens Blur has a Noise slider), or reduce the grain first with our guide to fixing grainy photos.
A floating subject
A uniform blur softens the floor at someone’s feet or the table under a product as much as the far wall, so the subject can look like it’s hovering. Crop tighter, lower the blur or switch to a depth-based method for full-length shots.
Overwriting the original
Always keep the unblurred file. iPhone edits can be reverted and Google Photos offers Save as copy, but exports from web tools and desktop editors are new files, so give them a new name.
How to fade the background of a photo
Fading is different from blurring: the background stays sharp but looks paler, so the subject stands out. It suits product photos, slide backgrounds and images with text on top.
- Cut out the subject with our free background remover and download the transparent PNG.
- Open the original photo in an editor with layers, such as GIMP or Photoshop, and add a white layer above it.
- Lower that white layer’s opacity to about 30–50%, until the background looks washed out.
- Place the transparent PNG on the top layer so the subject stays at full strength, then export a new file.
Use a black layer instead of white for a darker fade, and keep your original photo unchanged.
When to blur vs remove or replace the background
Blur photo background areas when the setting adds meaning. Remove or replace the background when the subject needs to sit on something else or meet a background rule.
- Blur it: lifestyle and team photos, product-in-use shots, headshots taken at work, and anything where a hint of place helps the story.
- Make it transparent: logos, cut-outs for slides and designs where you’ll add your own backdrop. Here’s how to make a background transparent for free.
- Replace it with a color: marketplace listings, ID-style photos and consistent team pages. Our guide to changing a photo’s background color covers white, blue and other common requirements.
- Profile headshots: a soft blur and a clean neutral backdrop both work on LinkedIn. Compare the options in our LinkedIn headshot background guide.
If the whole photo looks noisy rather than cluttered, blur won’t fix it. Clean up the grain first, then decide what to do with the background.
Frequently Asked Questions
How do I blur the background of a photo already taken?
Use a tool that finds the subject for you. Upload the photo to a free browser tool such as the Soft Learn Hub Background Remover and choose Blur, or use Canva’s Auto Focus, the Windows Photos Background panel or Snapseed’s Lens Blur. If the photo was shot in Portrait mode, adjust the blur in your phone’s gallery app instead.
Can I blur a photo background for free?
Yes. You can blur photo background areas for free with our browser-based background remover, with no sign-up or watermark, and iPhone, Pixel and Samsung phones include Portrait blur at no extra cost. Canva’s Auto Focus, Windows Photos and Snapseed are also free. Photoshop is the main option here that needs a paid plan.
How do I blur the background of a picture on iPhone after taking it?
Open the photo in Photos, tap Edit and drag the Depth Control slider; this works for Portrait mode photos. On supported iPhone 15 and later models, photos of people, dogs or cats taken in Photo mode can also become portraits: tap Edit, select Portrait and turn it on. For other photos, use a web tool or editing app.
How do I blur the background in Google Photos?
Open the photo in Google Photos, tap Edit, then Tools, then Blur, and move the Blur slider. On photos.google.com it’s under Edit > Tools > Blur. Google says tool options depend on the photo and some features are Pixel-only, so if Blur doesn’t appear, try another method from this guide.
Is a blur filter the same as portrait mode?
No. Portrait mode works at capture time, and on iPhone it records depth information, so the blur can follow real distance. A blur filter applied afterward, like our tool’s, softens the whole background evenly. Both keep the subject sharp, but depth-based blur usually looks more natural in scenes that recede, such as hallways.
Does blurring the background reduce image quality?
Not for the subject. Only the background pixels change, and our tool downloads at your photo’s original resolution. Visible quality loss usually comes from heavy JPG compression or enlarging a small file, not from the blur itself. Save a PNG if you plan to edit again, and keep the original file.
Can I blur the background of several photos at once?
Yes. Our background remover accepts up to 10 photos at a time, each up to 25 MB. They’re processed one after another on your device, and Download all (ZIP) saves every photo with the background and format you picked, which suits team headshots or a set of product photos.
Why does my blurred background have a halo around the subject?
A halo appears when the subject’s colors are blurred into the surrounding background, or when the cut-out leaves a thin fringe of the old background. Touch up the edges, use a lighter blur, or in a layer editor fill the subject out of the background layer before blurring. Check at 100% zoom.
Next steps
Pick one photo and try it now: open the free Soft Learn Hub Background Remover, blur photo background clutter with the Blur option and compare the result with your phone’s Portrait tools. If the blur looks too strong or too even for that shot, switch to a slider-based method from the table above.